 Skinning web applications using Xkins
 Skinning web applications using Xkins
[ << Previous ]
[ Next >> ] [ Print version ]
We will follow the phases in defining, designing, developing and deploying Xkins in a simple web application that requires skin management.
In our example, we are implementing an application that registers suscribers for two famous online book stores: Amazing and Barnie & Nibble. The application will be used in both sites (could be through a frame, portlet or whatever they want) but it has to have the look & feel according to each one.
We'll walk through these steps:
1) Obtain html pages with each skin
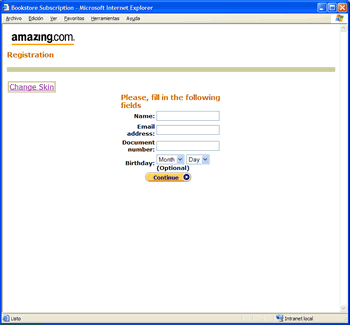
First of all, we receive the graphical design of the page provided by each bookstore. This could be the page prototypes and should contain all posible page elements that would appear in the application to be skinned (in our example, just one page).


As we can see, both pages have different colors, images and layout of the fields. Besides, required information indicator is diferent in both pages and the buttons in Amazing one is a gif, while in BN is an HTML button with styles.
2) Determine Skins templates
Now we must clip pieces of this pages to generalize some templates to be used by our application. We could start from zero, or we could base our html disection in a basic skin that is used to create forms. This basic skin comes with Xkins framework in XkinsForms tags. It defines frame, field, button, etc. and we should base on it and add the templates needed by our application (for instance, the branding).
XkinsForms basic skin also allow us to use XkinsForms tags in order to use the templates in our JSPs. Let see a list of the templates we need:
3) Creating the Skins
Once determined the different "pieces" of our UI, we will create both skins using Xkins. We start by naming them in the xkins-definition.xml file:
<?xml version="1.0" encoding="UTF-8"?>
<xkins>
	<skin name="base" url="/skins/forms/base" definition="/definition.xml"/>
	<skin name="amazing" url="/skins/forms/amazing" definition="/definition.xml"/>
	<skin name="bn" url="/skins/forms/bn" definition="/definition.xml"/>
</xkins>
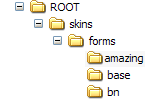
Now, we must create a directory structure in our ROOT directory of the webapp according to the defined in the configuration file:

In each subdirectory, we will place the definition.xml file describing the skin. We will walk throught some templates of the skin (not all). To see all the example, check out the example source code.
Lets see the skin definition syntax contained in definition.xml file of Amazing skin:
<skin name="amazing" extends="base">

</skin>
Base skin is the default skin that comes with XkinsForms and will help us to skin our application. Amazing skin extends it (and so BN) and we will start overriding it's templates for each skin, starting with field template:
<skin name="amazing" extends="base">
	<template name="field" group="field">
		<content><![CDATA[ $label $input ]]></content>
	</template>
	<template name="fieldLabel" group="field">
		<content><![CDATA[
<td align=right
	style="font-family: verdana,arial,helvetica,sans-serif; font-size: x-small;"><b>$label:</b></td>
			]]></content>
	</template>
	<template name="fieldLabelMandatory" group="field">
		<content><![CDATA[
<td align=right
	style="font-family: verdana,arial,helvetica,sans-serif; font-size: x-small;"><b>$label:</b></td>
			]]></content>
	</template>
	<template name="fieldInput" group="field">
		<content><![CDATA[
<td colspan="$colspan"
	style="font-family: verdana,arial,helvetica,sans-serif; font-size: x-small;">$input (Optional)</td>
			]]></content>
	</template>
	<template name="fieldInputMandatory" group="field">
		<content><![CDATA[
<td colspan="$colspan"><strong>$input</strong></td>
			]]></content>
	</template>
</skin>
Here all these templates are Velocity templates. Notice that the parameters are passed the template and the variables can be used like $colspan. These parameters are passed by the XkinsProcessor, which is called by the Taglib.
We start cutting and pasting the HTML from the mock pages from graphical design to the Xkins templates.
After that, we continue doing the same with the frame, the buttons and the branding. The following is a piece of the Barnie & Nibble's skin (just the field templates):
<skin name="bn" extends="base">
	<path name="images" url="/images" />
	<element name="spacer" path="images" url="/cleardot.gif"/>

<!-- field templates -->
	<template name="field" group="field">
		<content><![CDATA[

<td width="100%">
<table border=0 cellpadding=0 cellspacing=0 width="100%">
<tr>
$label
</tr>
<tr>
$input
</tr>
</table>
			]]></content>
	</template>
	<template name="fieldLabel" group="field">
		<content><![CDATA[

 <td WIDTH="25%"><font size="-1"
 		face="arial, helvetica, sans-serif">$label</font></td>
			]]></content>
	</template>
	<template name="fieldLabelMandatory" group="field">
		<content><![CDATA[

 <td WIDTH="25%"><font size="-1" face="arial, helvetica, sans-serif">$label</font></td>
			]]></content>
	</template>
	<template name="fieldInput" group="field">
		<content><![CDATA[

<td colspan="$colspan" style="font-family: verdana,arial,helvetica,sans-serif; font-size: x-small;">
	$input <br><b>(Optional)
	</b></td>
			]]></content>
	</template>
	<template name="fieldInputMandatory" group="field">
		<content><![CDATA[

	    <td WIDTH="25%">$input <img src="$res_mandatory" border="0"/></td>
			]]></content>
		<element name="mandatory" path="images" url="/mandatory.gif"/>
	</template>
	<template name="nestedField" group="field">
		<!--
		jsp:bodyContent
		-->
		<content><![CDATA[

<td colspan="$res_fieldColspan" style="font-family: verdana,arial,helvetica,sans-serif; font-size: x-small;">
$bodyContent
</td>
			]]></content>
	</template>
<!-- end field templates -->
<!-- The resto of the templates go here -->
</skin>
You can get the full source code of this example from here.
[ << Previous ]