 Skinning web applications using Xkins
 Skinning web applications using Xkins
[ Back to article ]
In this article, we see what is skinning a web application and how you can achieve this by using Xkins Framework. Xkins is a framework that manages skins for your web application. you can use Xkins along with other UI frameworks, like Struts and Tiles. In the article, we walk through an example of an application that needs 2 skins and finally add a new and really different skin.
What is to skin a web application? Skinning is to give it a different look and feel. A skin changes the way the user interface looks like, but doesn’t change it’s behavior nor what happens when the user clicks a button. A skin is the term given to a user interface appearance. Changing the skin results in changing the way the application looks like, but in order to achieve it, your web application should be aware of using a skin.
Skinning a web application is not an easy task. You can use CSS and change image’s paths, but you are limited to what you can do with CSS. If you have a component that look completely different in each skin, CSS could not be enough if HTML is different in each skin, though it could be if just changing styles solves your problem. A good approach to create a Skin is to determine each piece of the User Interface and try to generalize these pieces to apply an appearance to each one.
For example, if you have a frame component in Skin “A” that is just a plain table and in Skin “B” is a complex table with headers, footers, images and even sounds, a different HTML (more TRs, more TDs) should be generated for the frame in each skin: CSS for this situation is not enough.
As an example, let's supouse that in Skin A, the HTML that needs to be generated for render a label is as follows:
<p>This is my Label</p>
Now, in Skin B, this is how a label would be rendered:
<table background="/images/tablebg.gif">
	<tr>
		<td bgcolor="#0000FF">
		</td>
		<td background="/images/cellbg.gif">
			This is my Label
		</td>
		<td bgcolor="#0000FF">
		</td>
	</tr>
</table>
As you see, these two "pieces" of UI are completelly different in each Skin. They both have the same information (This is my Label) but are rendered with different HTML tags. This couldn't be done just with CSS. Perhaps using XSL/XSLT could be an option...
Or you could use Xkins.
Why should I skin a web application? Well, there are several motives for you to do this, but certainly it is not always a must-to. In a simple application skinning it would be over killing (apply KISS pattern), but in some situations you have to deal with this feature:
Xkins is a framework that manages skins for your web application. In early Java-Server-Side days, you used to put HTML hardcoded in a Servlet. Then, JSP came to allow you to put your HTML outside Java code. Nowadays, the same happens with taglibs that have HTML tags hardcoded in Java code. Using Xkins you can put this HTML outside your code with an additional and powerful feature: Skins. For a detailed information about xkins, visit Xkin's home page.
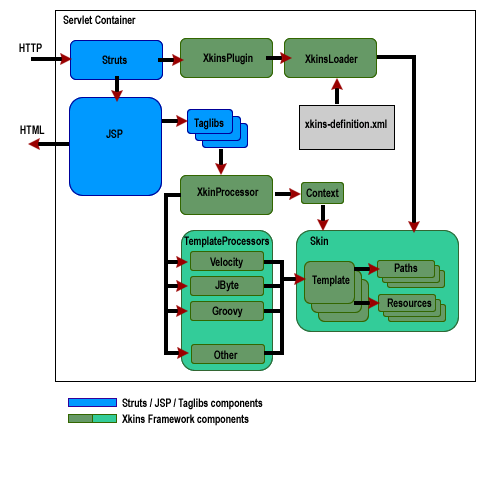
Xkins role in a web application is shown in the following high level graph:
 |
This is a request life cycle of a web application that uses Struts and Xkins through taglibs:
|
Xkins addresses skin management by following these basic concepts:
One important benefit that you get using Xkins is that all HTML is in one place and if you need to "tune" it you just simply change the templates. For instance, if your pages are "too big", you can detect where the exesive html generation is or what images could be stripped out and then change the templates in order to reduce page size. You could also have a "lightweight" skin for your application for users accessing by low speed connections, and have a richer skin UI for broad-band users. Notice that you can use Xkins among with CSS, in fact, it is recomended to use CSS for font styles and colors, because reusing CSS classes helps to minimizes page size by not needing to explicitily to indicate the font face each time.
A skin can be encapsulated in a single file (zip file) to be easily deployed in a web application. If you define a Skin Type, 3rd party Skins can be added to your web application if conforming the Skin type you declare.
There are a lot of ways to use Xkins, but used with taglibs is the best approach in a web application. You can use these tags to generate your pages or as decorators of your existing tags.
These are some tips in order to define a skin:
We will follow the phases in defining, designing, developing and deploying Xkins in a simple web application that requires skin management.
In our example, we are implementing an application that registers suscribers for two famous online book stores: Amazing and Barnie & Nibble. The application will be used in both sites (could be through a frame, portlet or whatever they want) but it has to have the look & feel according to each one.
We'll walk through these steps:
1) Obtain html pages with each skin
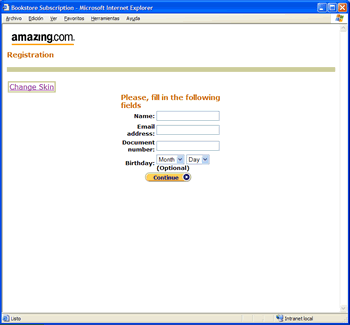
First of all, we receive the graphical design of the page provided by each bookstore. This could be the page prototypes and should contain all posible page elements that would appear in the application to be skinned (in our example, just one page).


As we can see, both pages have different colors, images and layout of the fields. Besides, required information indicator is diferent in both pages and the buttons in Amazing one is a gif, while in BN is an HTML button with styles.
2) Determine Skins templates
Now we must clip pieces of this pages to generalize some templates to be used by our application. We could start from zero, or we could base our html disection in a basic skin that is used to create forms. This basic skin comes with Xkins framework in XkinsForms tags. It defines frame, field, button, etc. and we should base on it and add the templates needed by our application (for instance, the branding).
XkinsForms basic skin also allow us to use XkinsForms tags in order to use the templates in our JSPs. Let see a list of the templates we need:
3) Creating the Skins
Once determined the different "pieces" of our UI, we will create both skins using Xkins. We start by naming them in the xkins-definition.xml file:
<?xml version="1.0" encoding="UTF-8"?>
<xkins>
	<skin name="base" url="/skins/forms/base" definition="/definition.xml"/>
	<skin name="amazing" url="/skins/forms/amazing" definition="/definition.xml"/>
	<skin name="bn" url="/skins/forms/bn" definition="/definition.xml"/>
</xkins>
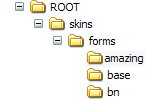
Now, we must create a directory structure in our ROOT directory of the webapp according to the defined in the configuration file:

In each subdirectory, we will place the definition.xml file describing the skin. We will walk throught some templates of the skin (not all). To see all the example, check out the example source code.
Lets see the skin definition syntax contained in definition.xml file of Amazing skin:
<skin name="amazing" extends="base">

</skin>
Base skin is the default skin that comes with XkinsForms and will help us to skin our application. Amazing skin extends it (and so BN) and we will start overriding it's templates for each skin, starting with field template:
<skin name="amazing" extends="base">
	<template name="field" group="field">
		<content><![CDATA[ $label $input ]]></content>
	</template>
	<template name="fieldLabel" group="field">
		<content><![CDATA[
<td align=right
	style="font-family: verdana,arial,helvetica,sans-serif; font-size: x-small;"><b>$label:</b></td>
			]]></content>
	</template>
	<template name="fieldLabelMandatory" group="field">
		<content><![CDATA[
<td align=right
	style="font-family: verdana,arial,helvetica,sans-serif; font-size: x-small;"><b>$label:</b></td>
			]]></content>
	</template>
	<template name="fieldInput" group="field">
		<content><![CDATA[
<td colspan="$colspan"
	style="font-family: verdana,arial,helvetica,sans-serif; font-size: x-small;">$input (Optional)</td>
			]]></content>
	</template>
	<template name="fieldInputMandatory" group="field">
		<content><![CDATA[
<td colspan="$colspan"><strong>$input</strong></td>
			]]></content>
	</template>
</skin>
Here all these templates are Velocity templates. Notice that the parameters are passed the template and the variables can be used like $colspan. These parameters are passed by the XkinsProcessor, which is called by the Taglib.
We start cutting and pasting the HTML from the mock pages from graphical design to the Xkins templates.
After that, we continue doing the same with the frame, the buttons and the branding. The following is a piece of the Barnie & Nibble's skin (just the field templates):
<skin name="bn" extends="base">
	<path name="images" url="/images" />
	<element name="spacer" path="images" url="/cleardot.gif"/>

<!-- field templates -->
	<template name="field" group="field">
		<content><![CDATA[

<td width="100%">
<table border=0 cellpadding=0 cellspacing=0 width="100%">
<tr>
$label
</tr>
<tr>
$input
</tr>
</table>
			]]></content>
	</template>
	<template name="fieldLabel" group="field">
		<content><![CDATA[

 <td WIDTH="25%"><font size="-1"
 		face="arial, helvetica, sans-serif">$label</font></td>
			]]></content>
	</template>
	<template name="fieldLabelMandatory" group="field">
		<content><![CDATA[

 <td WIDTH="25%"><font size="-1" face="arial, helvetica, sans-serif">$label</font></td>
			]]></content>
	</template>
	<template name="fieldInput" group="field">
		<content><![CDATA[

<td colspan="$colspan" style="font-family: verdana,arial,helvetica,sans-serif; font-size: x-small;">
	$input <br><b>(Optional)
	</b></td>
			]]></content>
	</template>
	<template name="fieldInputMandatory" group="field">
		<content><![CDATA[

	    <td WIDTH="25%">$input <img src="$res_mandatory" border="0"/></td>
			]]></content>
		<element name="mandatory" path="images" url="/mandatory.gif"/>
	</template>
	<template name="nestedField" group="field">
		<!--
		jsp:bodyContent
		-->
		<content><![CDATA[

<td colspan="$res_fieldColspan" style="font-family: verdana,arial,helvetica,sans-serif; font-size: x-small;">
$bodyContent
</td>
			]]></content>
	</template>
<!-- end field templates -->
<!-- The resto of the templates go here -->
</skin>
You can get the full source code of this example from here.
4) Using the Skins:
Now that we have a base skin and both needed skins, we can create the JSP pages that will use these skins.
We will be using XkinsForms tags because these tags use the templates defined in the base skin we use, but you could create your own taglibs to use Xkins just like XkinsForms does, without the need of using them. Besides, XkinsForms works fine with Struts framework, and we are using Struts in this application.
We need 2 pages:
This is just a demo application, so we wont really process the subscription request, just redirect from the index.jsp page to the done.jsp one. In a real application, a process would be done in between these pages.
Notice how Xkins is integrated with Struts. Xkins taglibs do not replace Struts ones, just "decorates" the page. You do not use for example <table> HTML tag, but uses <forms:frame key="frame.title" width="30%"> to contain the form and add skinning capabilities. If you have an application that uses Struts and you want to use Xkins, you just have to place XkinsForms taglibs in your pages to decorate it. Then, you should pass all HTML tags used in your JSPs to Xkin templates and let Xkins to generate all the look and feel.
Though not show in this example, Tiles can be used along with Xkins. Xkins and Tiles may work together without overlapping: let Tiles manage page layout and Xkins render your components.
Adding Xkins to an Struts existing application will be covered in a next article.
<html:form action="/subscribe" focus="lastName">
<xkin:template name="branding"/>
<forms:frame key="frame.title" width="30%">
	<forms:row>
		<forms:field key="subscription.name" mandatory="true" >
			<html:text property="name"/>
		</forms:field>
	</forms:row>
	<forms:row>
		<forms:field key="subscription.email" mandatory="true" >
			<html:text property="email"/>
		</forms:field>
	</forms:row>
	<forms:row>
		<forms:field key="subscription.document" mandatory="true" >
			<html:text property="document"/>
		</forms:field>
	</forms:row>
	<forms:row>
		<forms:field key="subscription.birthday">
			<html:select property="month">
				<option value="month">Month</option>
			</html:select>
			<html:select property="day">
				<option value="day">Day</option>
			</html:select>
		</forms:field>
	</forms:row>
	<forms:buttons>
		<forms:button key="button.continue" default="true" onclick="document.subscribeForm.submit();"/>
	</forms:buttons>
</forms:frame>
</html:form>
This is just a piece of the page (the full code is here) but shows the following:
We use Struts as the UI framework. I18n is also resolved by Struts. Then we use <xkins:template/> tag to renderize the branding template in the top of the page. And finally comes the <forms:*/> tags to render the form. We have a frame which contains multiples rows. Each row has one or more fields. When the frame renders, it ask each row to render itself. And each row ask the field to render. In each case, all these tags use the templates defined in the skin, so just changing the Xkins definition file the look & feel of the page changes without any JSP modification. The buttons tag contains the page buttons, and these buttons are passed by parameter to the frame template so you can place the form buttons where the template indicates. Here we use button tag to render a button according to the skin. In Amazing's Skin, we create a button with images (in a table) and in BN skin we use just html buttons. Notice also that the JSP page does not contains any HTML tag nor CSS class: all the HTML rendering and styles are delegated to Xkins.
5) Deploy the webapp:
Now that all the pieces are set, you just deploy the war file in a servlet container and start using the demo application.
In the example, we integrate Xkins with Struts. You configure the XkinsPlugin in struts-config.xml file like this:
<struts-config>
<!-- Struts specific configuration goes here -->
	<plug-in className="ar.com.koalas.xkins.struts.XkinsPlugin">
		<set-property property="config" value="/xkins-forms-definition.xml"/>
		<set-property property="autoReload" value="2000"/>
		<set-property property="skinType" value="base"/>
	</plug-in>
</struts-config>
Xkins and Struts integration will be covered in more detail in a next article
6) The business is expanding!:
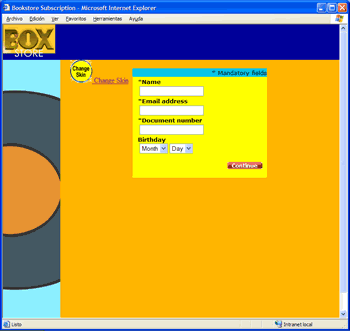
After implementing our application, The Box Store asks us our services for Book Subscriptions. So they gave us their application look & feel and we develop the Box Skin:

This skin could have a flash file with a character voice and has the Box colours. This skin is really different from previous ones, and shows how flexible is Xkins framework when developing skin aware user interfaces. Check this skin in the source code.
Xkins can not only be used to skin a web application, as Xkins architecture allows you to:
In summary, you could use Xkins as a single point for all templates in your application.
Even if you doesn't need Xkins capabilities to create pieces of HTML from templates, and if you just want to use CSS and images, you can use Xkins just for the sake of organizing your files. For example, you can declare the images paths, the CSS file names, etc:
This could be the Xkins definition:
<xkins>
<skin name="organizer" url="/images">
	<processor type="ar.com.koalas.xkins.processor.VelocityTemplateProcessor"/>
	<path name="images-bg" url="/backgrounds"/>
	<path name="images-icons" url="/icons"/>
	<path name="css" url="/css"/>
	<element name="logoffIcon" path="images-icons" url="/logoff.gif"/>
	<template name="stylesheet">
		<content><![CDATA[
			<link href="$res_stylesheet" type=text/css rel=stylesheet/>
		]]></content>
		<element name="stylesheet" path="css" url="/formats.css"/>
	</template>
</skin>
</xkins>
and in the JSP, you can use these definitions like this:
<%@ taglib uri="/WEB-INF/tld/xkins.tld" prefix="xkins" %>
<xkins:template name="stylesheet"/>
<table background="<xkins:path name='images-bg'/>/myBg.gif">
<tr>
	<td>
		<img src="<xkins:resource name='logoffIcon'/>"/>
	</td>
</tr>
</table>
As you can see, you can organize your files with Xkins and if you change a path or a image name, just changing the Xkins definition is enought.
As we’ve seen, Xkins is based on externalizing component rendering out of taglibs. This concept matches perfectly with JSF specification. JSF uses Renderers to generate HTML or whatever ML for its components. Xkins can be used to create renderers and add Skinning capabilities. Xkins Faces is an implementation of this concept. The main renderers implements Decorator Pattern for renderers of a JSF implementation. Xkins Faces define a skin type, so there could be a lot of skins created by 3rd party vendors accomplishing this Skin type. In this way, if you develop an application with JSF and Xkins Faces, you could download a new Skin for your web application, deploy and use it without any change, as all templates needed by Xkins Faces are defined in the skin type and all skins accomplishes this one. So in a near future, there could be a lot of skins to download and use them in your web application, or allow your users to compose their own skins based on existing ones and even use templates directly from the Internet without the need of deploy them.
Xkins Faces will be covered in a next article.
Guillermo Meyer works as a software engineer for EDS Argentina. He works with Java and is a Sun Certified Programmer for the Java Platform 1.4. He holds a degree of System Engineers at Universidad Tecnologica Nacional de Argentina. He is the creator of the Xkins framework.
Thanks to Nicolás de Amorrortu for the reviewing of this article.
[ Back to article ]